So, we now have a new tool added to our bag: curvature. To recap from part 2, the ‘S’ and ‘C’ curves are the basis for this concept, and can be integrated into our 3D fundamental shapes from part 1. Also in part 2, we built a better grasp of our fundamental 3D shapes by adding those with curved planes; these were the sphere, the cylinder, and the cone. At the end of that lesson, I stated that I believe the sphere to be the epitome of a 3D form; but, what exactly do I mean by that? Well, the answer to that will be found in today’s third and final lesson of this “Shape Up” series, giving us a huge boost in our three dimensional understanding, and thus, confidence, by the end. So strap in, start your five minute warm ups, and let’s get into the secrets of 3D space: Volume and Contour.

As taken from the Webster definition, Volume has a lot to do with mass. Mass, in simple terms, is “the property of a body…that is commonly taken as a measure of the amount of material it contains…” (also Webster). The amount of material an object (shape or form) contains within itself is its volume. Another way I like to think of volume is the amount of space an object occupies (or “takes up”). Because all physical things in our world occupy some amount of space, the understanding of volume is absolutely crucial for the skill-ceiling of all visual artists; again this includes 2D artists and animators. Now, apart from all the jargon, this means that volume is one of the major keys to being able to accurately imagine objects to draw. However, Volume itself cannot actually be illustrated. To return to our sailing journey metaphor, Volume is like a compass for our map; it lets us know we’re going in the right direction, but when you lift your eyes from the compass, you can’t literally see the North, South, East, or West markers physically in front of you. So what we need with this compass, is a heading, and that brings us to our next concept and exercise.
A TOUR OF CONTOUR

Just as a heading helps to make our direction and position more perceptible when sailing, Contour, our other major key, will do the same for Volume, making it easily perceptible. So what is Contour? As Webster defines it, it is the “outline of a curving or irregular figure.” Since we’ve already discussed and should have a good understanding of planes, or “faces” as we also call them here, this simple exercise should be relatively easy to apply to our previous ones.

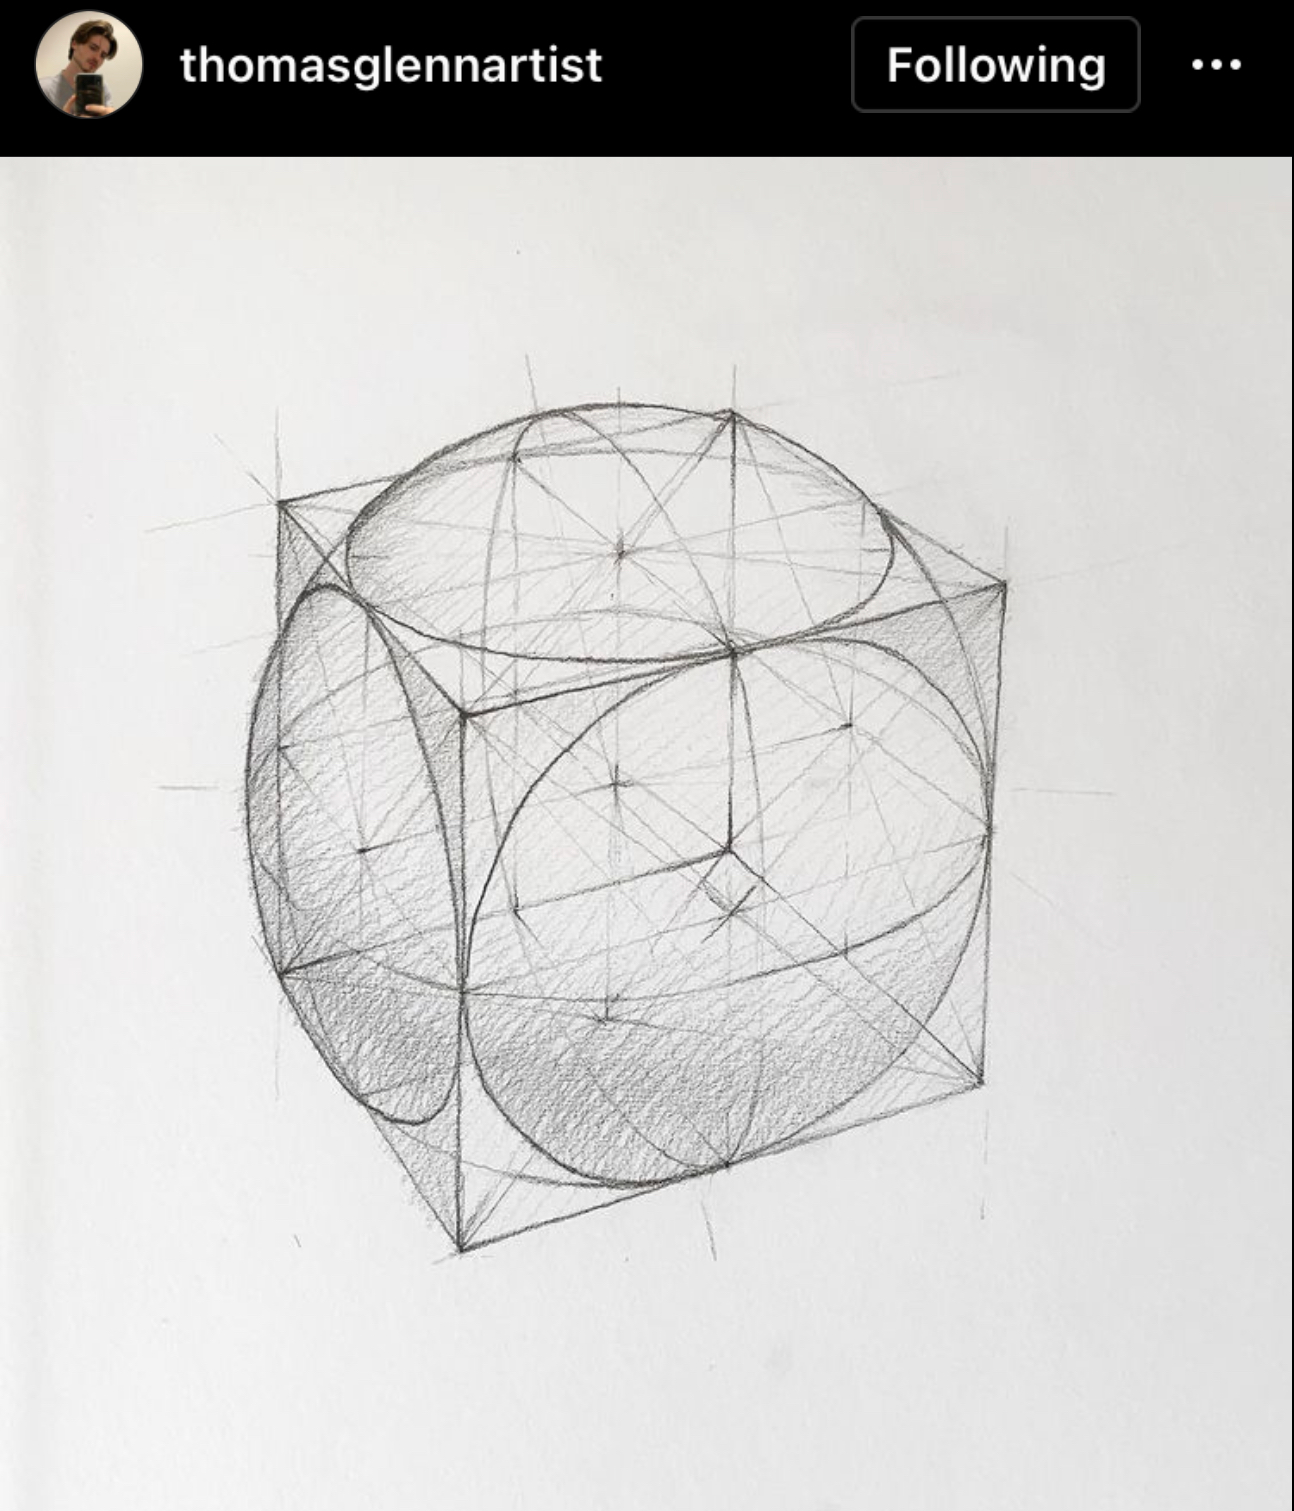
As we can see, I’ve arranged many of the fundamental 3D shapes from part 1 of this lesson above. You may have already noticed the lighter gray lines covering each as well. These lines should not only be equally spaced, but also parallel to each other and the outer silhouette of the shape. A great way to think about how this works is to think of a cube, and with it you have a few long strings; each of those strings happen to be just long enough to wrap all the way around that object until the ends touch. Looking at it after doing so, you’ll recognize that the contour of said cube has now been made visible through these strings! A visual example of this, along with a couple other shapes, is below.

Thinking of contour in this way will make this exercise a lot more comprehensible, especially when applied to some of the more complex forms of later lessons. Now, how does this exercise help us to perceive this above-mentioned mass and volume connection? Well, the initial outline of this object is called a “silhouette,” which is the outer border of the shape or form we may be looking at, but from a 2D perspective. What these strings do for us, however, is illustrate the 3D perspective of this object’s silhouette. This is the visual outline of a form’s volume, its Contour; it is how we can begin to intuitively perceive 3D mass. So while contour is our heading, Volume is what we’re trying to illustrate through this act of contouring. Thus, it is our compass and heading working together to show us we’ve been moving properly, once finished. When performing this exercise, always approach it from the “outside-in,” from the silhouette toward the black dot in the center of the shape. Technically it will be from the “furthest” part of the shape to the “closest,” but those will be points for later perspective lessons. This will make it easier to make parallel lines from scratch, as you’ll always have a nearby point of reference while drawing. Below is a brief example of the drawing order for the contouring exercise.

A HIDDEN PERCEPTION

I’d like to detour from here for a moment. You may have noticed the small dot in each of the contouring examples above. This dot does fill the face-value role of marking the ending point of our contouring lines, however, it also fulfills another important job. This dot also serves as a tiny, but useful, indication of perspective. You see, all of these drawn contour lines create the illusion of direction in these forms, showing which part of the object is [typically]“facing” us (toward the foreground), but also implying that the other parts are moving away from us (toward the background). This concept will lead us into a host of new aspects of dimensionality and form that we will absolutely be tackling soon. However, I just wanted to plant this mental seed here for us to keep where we’re headed in mind.
THE SPHERE OF [3D] INFLUENCE

Nearing the end of this three part lesson series, we’ve discussed and acquired a few new crucial skills: We’ve learned the fundamental shapes that make up how we visually perceive, we’ve learned to both recognize and create parallel lines and transform the 2D versions of these shapes into 3D, we’ve learned the two types of curves that can be applied to any of these 3D shapes, and lastly we’ve combined the latter two together to make the contour -and Volume- of these objects visible. Now, any person would likely be able to gather the relation between these different skills by now, however, there is a very specific reason we’ve learned each of these before addressing the 3D elephant in the room. That “elephant” is, of course, the Sphere. Why did I specifically leave the sphere for last in this lesson series? Beside the fact that the circle and sphere are irrefutably some of the hardest of shapes for us to draw, but because the sphere is also the epitome of a 3 dimensional object, as I mentioned in part 2.
Before we continue, I want to make clear that I do not believe that it is literally possible for the human mind to fully comprehend the mathematical precision of the Circle, and especially not of the sphere. As I’ve mentioned previously, our goal for now is not to weigh down our self-efficacy with matters that frankly are reserved for a calculator. The goal, as we’re just starting out, is to be able to perceive and depict believable visual objects (something we will dive into later, along with mathematical precision).
That being said, all of the previous lessons, and the important skills we’ve developed from them, have laid the groundwork for us to gain a perception of the most important attribute of 3D objects, which is Depth. If we paid a little bit of attention in our Geometry classes in grade school, we should remember how all three dimensions are measured: in Height, Width, and Depth, with the latter being the third dimension. Volume, as we’ve discussed it in this context, is synonymous with Depth (though that isn’t the only definition of depth). So now that we have made the connection between these skills a bit more apparent, let’s dive into our first big milestone of visual understanding, the Sphere.
GOING DE[PTH]EP
What do we see when looking at the illustration above? What sense does it give you? If you could go only off of your immediate visual perception, what does this drawing communicate? If we take it at face value, obviously there’s a sphere in the center, with arrows pointing out toward all directions at the same time, including “toward” and “away” from the viewer. This specific diagram was created to symbolize the perception of depth. When it comes to all shapes and forms, there is a stopping point for said depth, this makes up the “border” of those shapes and forms, which we can make visually apparent with our contouring lines. Again, as denoted above, this contour border can be considered the object’s 3D silhouette. Now, how does this make the Sphere the prime example of 3 dimensionality? Let’s look at one more diagram below to drive this point home.

As we take a look at the top three diagrams, sketched in the photo above, we’ll see a Pyramid and Cube. Each of these is drawn as transparent, with their insides showing arrows moving from what would be the center-point of these shapes toward the outer borders. If we study these for a couple minutes, we’ll notice that many of these arrows are not the same length; they reach each border at different lengths. This is what a visual example of depth would be, making up what we call the object’s “shape.”

Let’s now turn our attention down to the sphere version of this diagram at the bottom. This sphere diagram demonstrates the same as the above two shapes; however, each arrow would end up being the exact same length when they reach its “border,” regardless of the perspective. This makes its depth equidistant from its center in every direction, moving both inward and outward. It is perfectly three dimensional, just as the circle, its 2D counterpart, is a perfectly curved 2 dimensional object. Now, it’s worth mentioning that these diagrams were drawn free-hand, and so they are not, in any way, mathematically “accurate.” No rulers or other measurement tools were used, as the goal again is believability here, gained through intuitive practice methods, not mathematic perfection. No human can draw anything mathematically perfect without the assistance of tools or machines. However, that does not mean that our natural abilities should not be trained to reach as close as possible to such precision. This will make it so that once we do begin using such precise tools, and are confident enough to aim for specific accuracy, our work will end up that much more believable; it will also improve the proficiency (speed and skill) with which we use said tools.
SPHERICAL THINKING

Recognizing and understanding this new perception of three dimensional objects is a paradigm that I like to call “Spherical Thinking.” This mode of thought works as a superimposed view of our Visual World; it is being able to intuitively deduce the visual depth of an object based on its contour, from an imagined center-point that we’ll call the “Core Point,” which is similar to, but not the same as the contouring exercise’s dot. This “Core Point” is the three dimensional center of an object, from which its mass (volume) projects outward in all directions, and stops at its borders, contoured or otherwise. If an object is 3D, it will always possess this quality, this depth, of which the Sphere is exemplar. So now let’s use that string diagram that we used for the Cube, and other shapes, on the Sphere. What we’ll notice below is that with it we can visualize the form of the sphere, without using any lighting techniques yet. Just as with all other contouring exercises shown above, a dot should be drawn on a circle (anywhere can be the center on a sphere, unlike the other objects). Then, a lightweight (light pressure) circle should be drawn, parallel to the dark outer circle, just outside of the silhouette. Afterward, draw lightweight parallel circles, from the outside to the inside, toward the center dot.

Hold on, let’s take a quick look at this before continuing. It’s not exactly wrong, but it doesn’t feel quite right, does it? We did all the steps right, yet, it still kinda just looks like a circle with smaller circles in it. So what’s missing? Two things: first, direction; something that our contouring exercise already provides us with, with the help of the little dot. Second, something called “cross-contour.” Cross-contour is basically the same as contour, except instead of the lines being parallel to the initial shape’s border, they run perpendicular to it, or “counter” to its direction. Essentially, if the initial contour is moving vertically, then the cross-contour is moving horizontally. In keeping with the metaphor, it would be to take one of the strings and wrap it around the object in the opposite direction of the other strings. I also snuck another example of this in the cylinder and string diagram above. The middle grey line in the front traces horizontally along the front and side of the cylinder, which we cannot technically see (for reasons we will address later on), making it visible to the eye. This concept will also be of benefit when we get to the methods of complex forms, and has other uses outside of just understanding the sphere, like with perspective and shading techniques.

Above we can the difference in appearance just from adding those important two aspectsof direction and cross-contour. As mentioned above, that little dot effectively functions as an indicator of the direction of the surface of the sphere. The surface of the sphere is what these strings help us to understand, since all curved surfaces are a single plane, with no “faces.” This will be very helpful for us to in the future when working with light and color.

Ok, we’ve gone over a lot in the third and final part of this “Shape Up” lesson. Let’s do a brief recap of our main concepts and exercises, and then I’d like to make a couple closing points.
From our previous lesson, we gained a knowledge of Curvature, a valuable tool and stepping stone toward the use of our “heading”, Contour. Contour acts as the visual aid for understanding the 3D version of what we call a Silhouette, giving us a nearly complete perception of a 3D object, while on a 2D surface. Contour also acts as an aid for perceiving the Depth or Volume of a visual object, which is the Third Dimension itself. The “Contouring” exercise method, covered in this chapter, helps us gain an intuitive grasp on this concept of Curvature, which should eventually result in a natural sense of said Volume of the visual objects we see and create. This exercise should be practiced on as many of the previous Fundamental shapes, and “Sculpted” shapes (Lesson 3, part 2), that one can come up with. Now that we’ve finally successfully converted all of the fundamental 2D shapes from previous lessons into perceivable 3D shapes and forms, we now have a couple new practical and effective exercises to our repertoire.
THE END AND BEGINNING

Now, these exercise methods will always circle back to their main purpose, which is the main purpose of this entire site and its ideas, the imagination. Thus, there are a couple last exercise of this section of methods that we’ll go over in the next lesson, which will help us to blend this new perception of Forms with our current powers of imagination. Keep these Spherical Thinking and String & Cube exercises in mind over the next few days; when looking at objects, try to visualize strings and yarn being laid across and all-around all objects you see throughout the day. Try to imagine objects’ volumes, extending from their own core points to their outer contours, and then try to draw them. This will continually exercise our visual perception, and by proximity, upgrade our artistic perceptions and skill as well.
This third and final part of the Shape Up lesson series was a long one, but hopefully useful in adding a new point of view and new exercises to work on together. Until the next one, always remember: